Decoupage Instructions for Easy and Inexpensive Gift Making
Decoupage 101: For Gift Making
Decoupage instructions vary greatly, and although decoupage is an easy craft, there are many ways you can approach a decoupage project.
Most people do agree that the purpose of decoupage is to make a cut-out paper image look like it's part of an object (and always has been).
Such a goal lends itself perfectly to gift making - because you can make a gift out of something old, something cheap, or something that's just plain boring and waiting for a new life.
Some of the surfaces that can be transformed by decoupage include metal, wood, terra cotta, pottery, glass, plastic and cardboard.
These decoupage instructions explain the best way to:
- Prepare Paper and Images
- Prepare a Variety of Surfaces
- Apply Paper Patterns and Cutouts
- Varnish and Seal Decoupage Projects
Decoupage Instructions...
1. Prepare Decorative Images
Choose thin paper with decorative designs and images that you wish to cut out. Some common papers include, scrap book paper, wrapping paper, laser copies, napkins and tissue decoupage paper. Nearly any paper can be used, thicker paper is best used when you won't be cutting delicate designs. Some thick paper can also be thinned by wetting and tearing off the bulky backing to make it thinner.
Cut images carefully. When using very thin paper it can be helpful to paint a thin layer of decoupage medium on before cutting. This preparation can also be used to stop smudging with bleeding papers such as inkjet printouts.
Seal images if needed. In many cases, your images will not bleed, this is best. However, I've come to enjoy printing images for decoupage with my inkjet printer and you might too. The web has many suitable images that are free to download and print. Inkjet printouts need to be sealed with spray sealer or if you're very careful, by quickly swabbing a layer of varnish over the printout and allowing to dry. Laser printed images will not bleed.
2. Prepare Surfaces for Decoupage
First, clean all surfaces thoroughly with warm water and in some cases, a tiny bit of mild detergent. Rub dry with a lint-free cloth or allow to air dry completely.
Wood Surfaces. Seal untreated and unpainted wood surfaces with paint or stain.
For old wood that has been previously painted or treated, use a medium-grit sand paper to sand down until reasonably clean. Then prime and paint or stain the wood.
Metal Surfaces. One option is to buy clean, pre-primed metal from your craft store.
However, for old metal, remove any loose rust with a wire brush or steel wool. Especially for old and deeply rusted objects, you may want to apply a rust inhibitor such as red oxide or use red oxide rust resistant paint. This will help insure a long and beautiful life for your homemade gift.
After removing and protecting against any rust, it's a good idea to apply one coat of metal primer before painting or sealing. This helps to create a solid base so that the metal underneath won't eventually show through and dirty up the new paint. Now seal with paint or varnish.
Glass Surfaces. Clean glass with warm water and mild detergent. Dry with lint free cloth. No other prep is necessary.
Ceramic Surfaces. Lightly sand surface to help the primer stick better. Next, apply one coat of acrylic primer or undercoat.
Terra Cotta. Terra cotta is extremely porous. Either buy pre-sealed terra cotta from a craft store or seal terra cotta with a water-based sealer.
Cardboard. Cardboard needs no preparation for decoupage. If you desire, you can paint and/or seal it before applying images.
Note: Allow all surfaces to dry thoroughly before applying cutouts.
3. Apply Paper Patterns and Cutouts
Place Images. After allowing any primer or paint to dry thoroughly, it's time to place your images. You can use removable tape to temporarily secure images onto your piece, moving and arranging them as needed.
Moisten Images. In some cases, it's a good idea to moisten the paper before applying. This will prevent wrinkles when the glue dries. It's easy to do this with a spray bottle set on mist. Be very careful working with moistened paper, as it will be much more delicate, and is prone to easy tearing as well us rubbing of the surface.
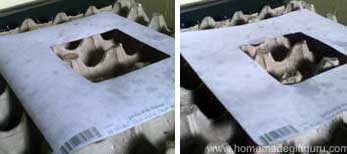 As you see above, when the paper is moistened, it will first tighten up and curl, then it will flatten back out as it relaxes. Gluing the paper down in a relaxed state will prevent wrinkles from showing up when the glue dries.
Apply Images. Once your design is well placed, cover either the back of the image or the surface you will be gluing onto with white all purpose glue or decoupage medium. With large pieces, it can be helpful to start by gluing a corner or an edge, then work your way across, gluing section by section and smoothing the paper along very gently with a soft cloth or paper towel.
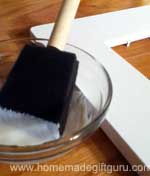
Tip: Using a wide foam brush is the best for applying glue because your glue brush will get ruined from time to time. Once the glue dries even a little on a brush, it is ruined. Foam brushes are cheap and easy to replace. At the very least, designate a brush or two only for glue as they will not make good paint brushes once they have been used for glue.
This method will help you get the positioning right and avoid mistakes that sometimes occur when the paper is put down to fast. Once applied, it is usually impossible to remove an image without ruining it.
Tips: Keep paper towels or rags close by (preferably one moist and one dry) and remove any glue from fingers as you work. In some cases you can use a bone folder to smooth designs without using your fingers. Use a damp paper towel or sponge to keep edges of cutout clean from glue as you smooth on the design. When using your fingers to smooth paper, it can also be helpful to get keep them damp, this can help prevent easy tearing.
Once you've got your image flawlessly (or close to!) glued down, the hard part is done. Allow to dry completely.
2. Seal Project.
Sealing the project is the last step in these decoupage instructions but a very important one. You can use decoupage medium or varnish. Varnish works best for me as it is thin, easy to apply and self leveling. It dries flat without a rubbery feeling to it. Decoupage medium such as Modge Podge (in my experience) is prone to leaving brush strokes and feeling as well as looking rubbery. You only need one layer but multiple layers will achieve the look of the image being "painted on" rather than glued on.
Apply one thin layer of decoupage medium or varnish with a wide soft brush (such as goats hair) over the images or in many instances, the entire surface of the project. Allow this to dry completely per manufacturers instructions before applying additional layers. Sand lightly between each layers.
That's it! There are other things you will learn on the way but the decoupage instructions above should give you an excellent starting point.
Note: If you haven't already seen it, there are 5 of my best decoupage instruction tips summarized on the main decoupage projects page...
Decoupage Instructions Will Get You Going...
These decoupage instructions will get you going. It seams that everyone who learns to love decoupage develops favorite products and special ways of achieving the results they like most...
Decoupage Supplies. Decoupage can be super simple with only basic and inexpensive supplies (see Decoupage Supplies for more info) or it can be more involved, if you choose fancy paints, specialty varnishes and other specialty products such as crackle medium.
Bottom line? Start simple with these easy decoupage instructions. With these decoupage instructions, tips and ideas, you'll love what you can achieve. If you grow to love decoupage, branch out by buying a new paint or medium every so often and have fun experimenting...
Whatever you create, we'd love it if you would snap a picture and post it in the gallery...
Happy Crafting! Happy Gifting!
Related Pages...


Search This Site!

Recent Articles
-
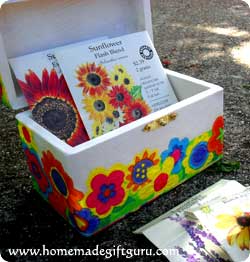
Napkin Decoupage Box
Apr 24, 24 04:12 PM
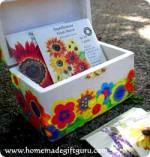 This flowery napkin decoupage box would make a cute thank you gift, birthday gift or Mother's Day gift but can be customized for any person or occasion depending on the napkin design and contents...
 -
Herb Wreath
Apr 10, 24 02:48 PM
 Learn how to make a fragrant herb wreath for a fun handmade gift right from your garden...
 -
Sock Crafts: Sock Bunny Kits
Mar 21, 24 07:34 PM
 Share the fun of sock crafts by making some of these DIY sock bunny kits! Free printable included.