Napkin Decoupage Box
Decoupage Projects: How to Make a Napkin Decoupage Box

Wondering what a napkin decoupage box is? Well...
You take an unfinished wooden box (you can find them super cheap at your local craft store) and make it beautiful using a paper party napkin!
This creative idea hardly cost anything to make and they make fun trinket boxes and keepsake containers for a variety of homemade gifts!
You can then fill your decoupage box with flower seeds, playing cards, sentimental items such as photos, poems or memorabilia or anything else you can think of... most likely depending on the theme of the party napkins you use and the person/occasion it's for.
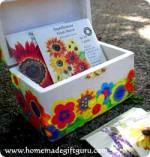
I created this particular napkin decoupage box for a homemade Birthday gift for my mother, whose birthday is in the early Spring. I chose a flowery napkin design and I filled my decoupage flower box with several packages of flower seeds, since she loves to garden.
A Spring-themed decoupage napkin box full of flower seeds would also make a thoughtful homemade Mother's Day gift.
Or you could go in a completely different direction, such as a sports theme napkin decoupage box full of trading cards for a kid or a baby cute theme for a new mom to store baby memorabilia such as hospital bands and a baby announcement. More ideas below!
If you are interested in learning more about how to decoupage various surfaces, here's a handy page of decoupage instructions and tips for you to check out.
Personalize This Gift Idea For Any Occasion...
Depending on the theme you choose, your napkin decoupage box could make a great homemade thank you gift, birthday gift for boy, birthday gift for girl, party favor idea, gift for a coworker, Mother's Day gift, Father's Day gift, baby shower gift... just about any occasion.
Here's a Few Ideas For Customizing Your Napkin Decoupage Box:
- Sports themed party napkins for giving baseball cards and other sports themed trading cards.
- Baby shower themed party napkins can be used to create a special box for a new mom and dad to store priceless baby memorabilia, such as hospital bands from mom and baby as well as a baby announcement.
- Superhero party napkins for giving super hero trading cards (or other characters and character cards).
- Artsy party napkins for giving your own artist's trading cards.
- Floral themed party napkins for giving potpourri, bath and body (ex. bath bombs, bath salts, lotions etc) or flower seeds.
- Sentimental themed party napkins for giving photos and memorabilia.
- Holiday themed party napkins for giving holiday themed candy.
- Game night themed napkins for giving dice and playing card decks.
- Wedding themed napkins for giving homemade wedding gifts to those in your wedding (such as Bridesmaids gifts etc.).
- Tropical and Beach themed party napkins would make a great decoupage box for someone who collects sea shells and might need a special place to keep them.
- Valentine's Day or Anniversary themed party napkins for giving small romantic gifts (memorabilia, love notes, photos, massage oil) to your boyfriend or girlfriend etc.
and more... browse around a party supply store for inspiration. Build your box around his or her party theme for a custom homemade birthday gift idea...
Decoupage Instructions: How to Make a Napkin Decoupage Box
So you've got an unfinished wooden box!


And some left over party napkins... (perhaps you even nabbed that gorgeous napkin from that party the other day with art in mind)...
You could make a napkin decoupage box!... printed paper napkins make for some very interesting decoupage designs...
You can, of course, use other thin paper in place of paper napkins... (think magazines, calendars, gift wrap etc)
Materials and Tools:
- Wooden box
- Decorative Paper Napkin and Scissors
- Fine sand paper
- White acrylic paint and paint brush
- Decoupage glue or all purpose white glue and foam brush
- Varnish and wide soft brush
- Helpful Items: Paper towels, lint free cloth and moist rag for keeping fingertips clean
- Optional: you may need a craft knife (see step 6)
To Make a Napkin Decoupage Box:

Step 1. Remove any hardware. To avoid getting paint, glue and/or varnish on metal clasps and screws, it's best to remove these pieces before you start. You can often use a small screw driver (or even a small pair of scissors, depending on the shape and size of the screws). Keep hardware in a very safe place.
Step 2. Lightly sand the box. Very lightly sand and smooth entire box, especially any rough edges. Wipe with lint-free cloth.
Step 3. Paint. Paint box inside and out with acrylic paint or spray evenly with spray paint. It usually takes a couple coats. Allow each layer to dry according to manufacturers instructions, sand lightly between layers.
Painting Tips...
It's best to use a light color of paint such as white due to the thinness of napkins. Dark colors will usually show through napkins and other light weight papers.
Or... For an aged look, you could also opt to paint one darker coat of paint followed by a coat of white. Later on, after your image is adhered, you could use crackle medium on the areas of your choice, adding to the depth and contrast of your decoupage project.

Step 4. Cut image. Cut out design(s) from napkin. Be sure to gently separate any layers that the napkin may have.
Step 5. Glue Image. After you've settled on the placement of your design, it's time to glue it on. Using something like Modge Podge (decoupage glue) or watered down Elmer's glue, apply a light coat to the box where you want to glue down your design. Gently press your design to the box and allow to dry thoroughly before continuing decoupage project.
Note: Because paper napkins are so thin, it's usually not necessary to moisten the paper before gluing, however, a very light mist can be applied if you're worried about wrinkles. Moisture will of course make the napkin even more delicate. See decoupage instructions for more tips and instructions if needed.

Gluing Tips...
You can work in sections, apply glue with a foam brush, press on image and gently smooth image starting at a center point and working outward.
Keep hands clean as most napkins will bleed onto your hands when wet, which can then transfer back onto your project.
It's a good idea to keep paper towels, a small bowl of water and damp rags next to you as you decoupage. You can also use paper towels to help smooth, provided you are very gentle.

Step 6. Cut if needed. After gluing down your design and allowing to dry, use a razor blade to slice design if needed, where box needs to open.

Step 7. Varnish. Once everything is glued down and thoroughly dry, it's time to apply varnish. If you'll be doing any other decorating (such as using crackle medium, do this first). Once your box is to your liking, apply one layer of varnish with a very soft wide brush, do this very gently and very quickly to avoid colors bleeding. Allow to dry and repeat as needed over entire box.
 |
 |
Step 8. Hardware. Put hardware back on and you're done!

Now, look at the beautiful napkin decoupage box you have made!
You can also customize the inside of the lid for a surprise when the box is opened using:
- Photos
- Letters
- Quotes
- Affirmations
- Bible Psalms
- Other Images
- Scrapbook Embellishments
and more...
 |
 |
Get more decoupage projects here!
Related Pages...


Search This Site!

Recent Articles
-
Napkin Decoupage Box
Apr 24, 24 04:12 PM
 This flowery napkin decoupage box would make a cute thank you gift, birthday gift or Mother's Day gift but can be customized for any person or occasion depending on the napkin design and contents...
 -
Herb Wreath
Apr 10, 24 02:48 PM
 Learn how to make a fragrant herb wreath for a fun handmade gift right from your garden...
 -
Sock Crafts: Sock Bunny Kits
Mar 21, 24 07:34 PM
 Share the fun of sock crafts by making some of these DIY sock bunny kits! Free printable included.