Beaded Charm Cards
How to Make Unique Greeting Cards Using Beads, Thread and a Key Chain Ring...

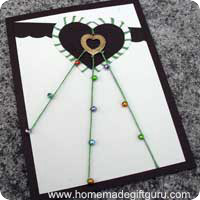
Beaded charm cards make fun handmade Mother's Day cards. They also make great ideas for making birthday cards.
I managed to create this using basic supplies I had in my craft room. I bet you can too!
...If you've got paper, glue, thread, beads and an old key chain ring... you've got the materials to make your own cards like this.
Note... The beaded charm card above was inspired by some cards I made using laser
lace, an inexpensive charm that I purchased with some jewelry making supplies (shown below).
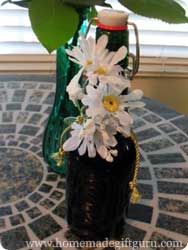
Here are the first beaded charm cards that I made. I used them for Anniversary cards, along with a little homemade Kahlua!
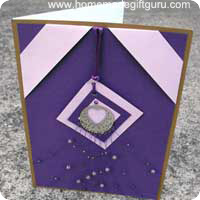
I enjoyed creating the above homemade Anniversary cards so much, I decided to create this similar card making idea that doesn't require any special supplies.
Here's How to Make This Beaded Charm Card (No Charm Required)...

This beaded charm card making idea can be customized to no end...
It makes an extra special Mother's Day card or a great idea for making Birthday cards, an Anniversary card (think white with a touch of lavender for example) or even a Wedding card (use elegant paper and tiny pearls or pearl-like like beads for example).
Green Tip... If you like using re-claimed materials in your crafting (such as the re-claimed key chain ring I use), you may also like these recycled craft card ideas.
Materials...
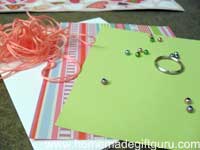
- card blank 5" x 6"
- patterned paper 5" x 6"
- matching solid paper 4 1/2" x 5 1/2"
- key ring
- embroidery thread
- beads
Tools...
- glue
- needle
- scissors
- masking tape
Instructions...
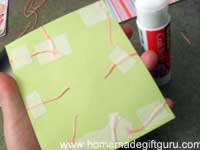
- Adhere 5" x 6" paper to card blank and set aside.
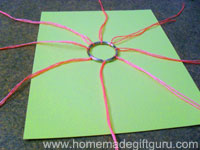
Note: It may be helpful to put a book on top of the card so it dries very flat. - Cut 4 pieces of embroidery thread to about 12".
- Embroidery thread usually consists of 6 strands of thread. Pull each piece of embroidery thread in half (this should give you 8 lengths with 3 threads each).
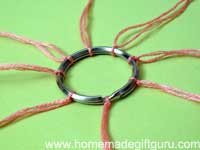
- Wrap each piece (3 threads) around the ring and match up the ends. Tie a knot securing each piece to the ring. Do this in even distances around the ring leaving equal lengths of thread (there will once again be 6 threads apiece) coming off and out to all sides (as shown below).
 |
 |
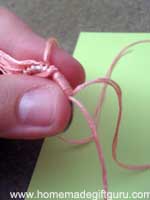
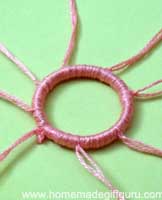
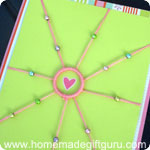
- To wrap the ring in thread, it's easiest to push all the pieces you just tied together to the side. Start wrapping snugly around the ring with a new piece (a couple feet is plenty), covering the ring entirely. Each time you get 1/8 of the way around the ring, stop and pull a knotted thread in place. Continue wrapping until the ring is covered and the threads are all in place. Tie the ends together and trim. If possible make the knot so it is hidden under the ring.
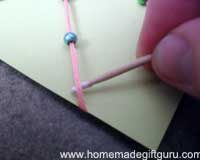
- Using a toothpick, dab a dot of clear drying glue next to each bead and move the bead onto it to secure their positions. Then dab glue under the ring and under the threads near the edges of the paper to secure the card. Without this step, the threads may loosen up and move around with time.
- Now that the embellishment is complete, you can center and glue the card stock to the patterned paper. Use a glue stick or a tape runner. Be sure to rub glue across all the threads on the back too to further secure everything.
Optional Ideas...
You can put a sticker such as a heart as seen above, stamp a
word inside the circle or leave it blank.
Inside of card can read...
"Have a bright and beautiful birthday!"
"Thank you for brightening up my life!"
"You Make My Heart Shine"
(place a heart sticker or draw a heart in the circle)
"You Light Up My Life"
(leave the circle empty)
Related Pages...
Search This Site!

Recent Articles
-
Napkin Decoupage Box
Apr 24, 24 04:12 PM
 This flowery napkin decoupage box would make a cute thank you gift, birthday gift or Mother's Day gift but can be customized for any person or occasion depending on the napkin design and contents...
 -
Herb Wreath
Apr 10, 24 02:48 PM
 Learn how to make a fragrant herb wreath for a fun handmade gift right from your garden...
 -
Sock Crafts: Sock Bunny Kits
Mar 21, 24 07:34 PM
 Share the fun of sock crafts by making some of these DIY sock bunny kits! Free printable included.