Make a Pouch for Your Handmade Cards
Need a Creative Idea for Sending Small Gifts or Money? Here You Go... Free Card Making Template Included
This card making template is designed to make a pouch-like-pocket to go on your handmade cards.
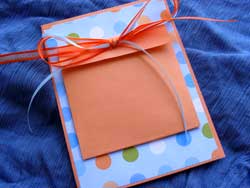
Attaching a paper art pocket to your handmade greeting cards gives you a creative way to send money or other small gifts.
The pocket even looks a lot like a present, ready to be unwrapped!
Make a Pouch Card Your Way...
You can use the card making template provided to make a pouch pocket using whatever paper you have on hand.
Feel free to follow along with the tutorial... or put your own twist on your card making project, by using your own layout as well as your own colors, patterns, ribbon and so on.
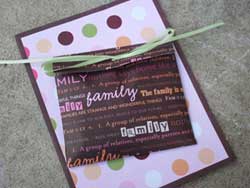
The pouch card to the left has a cute and crazy "I love my family" theme. If you make a pouch card, share your photo here!
"Make a Pouch" Card Making Project...
Supplies:
- Card Blank. 5 x 6.5" white card blank (Here's how to make a card blank).
- Paper. in at least 2 colors or patterns (amount:
two 12" x 12" or three 8 1/2 x 11" pieces of paper).
*used here is orange solid and a coordinating polka dot paper, I used paper rather than card stock because it's easier to fold paper into a pouch rather having to score and fold heavy card stock. - 1/8" Ribbon. 1 or 2 colors... cut about 2 feet for each. Raffia or craft cord works well too.
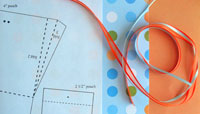
- Template. click here to download the card making template - 4-inch-pouch.pdf
- Optional: eyelet
Tools:
- Hole punch 1/8" size
- Glue
- Scissors
- Optional: eyelet setter if using eyelet
Instructions:
- Print Template. Print the card making template provided in supplies.
- Start with Card Blank. Make or purchase a 5 x 6.5" card blank.
- Build Front of Card.
...Cut orange paper (or whatever paper you choose) to 5 x 6.5".
...Glue to front of card blank and allow to dry.
...Cut polka dot paper to 4.75 x 6.25" (or smaller for a larger border)
...Center and glue to front of card blank, allow to dry.
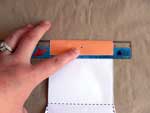
- Cut design from Template.
...First cut loosely around the template you plan to use, the 4" template.
...Paper clip or tape the 4" pocket template to the front of the remaining orange paper.
...Cut around the solid edges of the pocket template.
...Punch each of the three 1/8" holes where indicated by template.
- Eyelet. If you will be using eyelets, set them now, because it will be harder to do after the pocket is folded and glued together.

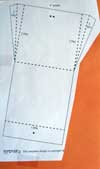
- Fold Template Design to Make Pouch.
...Turn the cut out over so it's face down (the color or pattern you want showing will be face down against the table) and with the single hole on the top.
...Place the template on top of cut out so you can still see the dotted lines.
...Fold top 1" down as indicated by dotted line on template, it's also marked "fold 1".
...Fold bottom up as indicated by "fold 2".
...Fold flaps in against back as indicated by "fold 3".
...Turn pouch over and fold flaps out accordion-style where indicated by "fold 4"
...Reposition flaps inside pocket and glue them down to make a pouch as shown upper right.
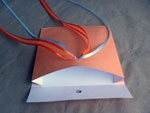
- Position Ribbon. Pull each end of the ribbon all the way up through the two holes under the flap in even amounts as shown to right.
- Glue Pouch Down. Glue pouch to front of card. Allow to dry.
- Insert Gift. Insert a small gift or money... you could also enclose a special picture, a love note, a poem or a gift card.
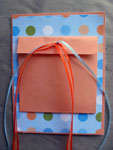
- Close Pouch and Make a Bow.
...Gather the ends of the ribbon and pull them all through the single hole in the flap - it helps to trim ends at a sharp angle first and squeeze them all together snugly.
...Tie ends in a bow skipping the knot so the recipient can simply pull the ends of the ribbon to release the bow completely. - Finishing Touches. Now that you're done with the card, write or stamp your message inside and mail it off!
Note: This card may need a larger than usual envelope, such as a 6" x 9" bubble mailer, to support the bow and sendable gift.
FYI - The pouch card making template provided has an additional 2 1/2" pouch for you to work with as well (if you choose to). Enjoy!
Related Pages...
Search This Site!

Recent Articles
-
Napkin Decoupage Box
Apr 24, 24 04:12 PM
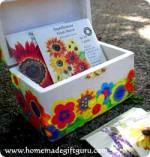 This flowery napkin decoupage box would make a cute thank you gift, birthday gift or Mother's Day gift but can be customized for any person or occasion depending on the napkin design and contents...
 -
Herb Wreath
Apr 10, 24 02:48 PM
 Learn how to make a fragrant herb wreath for a fun handmade gift right from your garden...
 -
Sock Crafts: Sock Bunny Kits
Mar 21, 24 07:34 PM
 Share the fun of sock crafts by making some of these DIY sock bunny kits! Free printable included.