DIY Christmas Countdown Calendar
Make Your Own Advent Calendar, with a Treat for Each Day, Using DIY Advent Calendar Templates

Christmas countdown calendars are such a fun tradition!
...But rather than buying the store-bought ones full of junky artificial chocolate (have you tasted them recently?)... you can make your own and fill it with anything you want!
Making your own Christmas advent calendar gives you the opportunity to create a unique countdown experience full of your own hand-picked or homemade gifts and always, with your special child(ren) in mind.
Homemade advent calendars are perfect for parents that want more control over the treats given within an advent calendar.
They are an excellent option, when given to kids who have sensitivities to sugar, artificial colors, artificial flavors and other additives and preservatives.
And they're fun for anyone who likes Christmas crafts and wants to shower their kid(s) with a little daily Christmas cheer leading up to Christmas.
How to Make Your Own Christmas Countdown Calendar...
The countdown calendar project featured on this page, is one I made using these advent calendar templates with a fun variety of Christmas patterned paper.
Each gift box had a very small surprise for both of my children, plus a special daily homemade Christmas message that I felt good about.
For treats, I shopped in the bulk department of my local grocery store and was able to get something different (and individually wrapped) for every single day! It cost me less than $10 for two kids, although it took me about 20 minutes to put all those tiny treats in bags and label them with their bulk bin #.
I have to say, I was pleased with this countdown calendar adventure and the calendar itself was a fun addition to our Christmas decorations.
Below, I share how you can use the advent calendar templates provided to make your own Christmas countdown calendar, plus tips and ideas for including gifts, treats and/or loving messages for each day.
To Make Your Own Christmas Countdown Calendar...
Step 1. Prepare the Boxes:
- Print the advent calendar templates you would like to use. I've included 5 different templates, all of which I used for my project. You can do the same, or you can stick to just one size, the idea is very flexible.
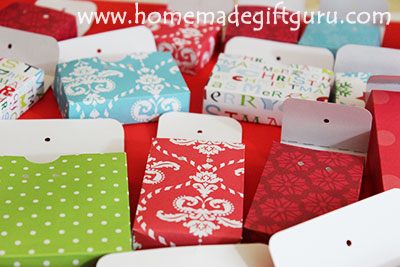
- Assemble the boxes as shown on the advent calendar templates page. This project uses 24 boxes to go from December 1st through Christmas Eve.
Tip... If you're low on time but still want to create a Christmas countdown calendar, you can alter the idea a little... for example, the 12 Days of Christmas would be another fun theme.
Step 2. Assemble the Calendar:
As you can see below, there are lots of ways to customize this creative homemade gift idea...
The countdown to the left was made using all one template and simple, shimmery paper, for a more elegant look.
The one to the right was made using all 5 sized templates and several different Christmas patterns, for a more whimsical, eclectic look.


Supplies for Making Your Christmas Countdown Calendar:
- Attachable Gift Boxes. You'll need 24 assembled gift boxes, complete with ribbon or closures of some kind (see above section for a link to the templates and instructions for the attachable gift boxes).
Tip... Make as many as you'll need for your project, I chose to make 24. - Calendar Base. Craft board or card board are both good choices for the base. Use something that is strong enough to hold all your boxes with the gifts inside.
- Paper to Cover Base. Poster paper or gift wrap both work well to cover the base and make it look beautiful. I used a large piece of red poster board.
- Strong Adhesive... You don't want the boxes to fall off the board when you put gifts inside. I used mounting squares to adhere my boxes to the base. In my experience, they are easy, mess-free and strong enough for these projects. I get mine from the dollar store and they work just fine.
- Decorative Stuff... You may want to spell out December like I did, or perhaps you have your own clever title to put on your Christmas countdown calendar. You can also use things like glitter, stickers, markers, bows or old Christmas card images to decorate your countdown project.
Instructions:

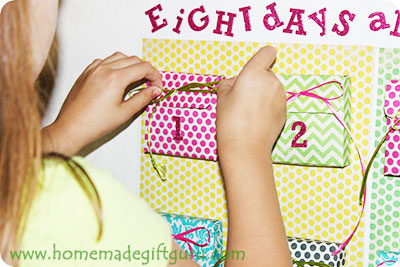
- Lay Everything Out. Position all your gift boxes onto the calendar base, making sure they fit nicely. Trim it down if necessary. No need to tie your boxes closed yet, (I did in the picture but then I just had to untie them all afterwards) since you will be filling them with gifts later.
- Cover Base. Cover your calendar base with poster paper (like I did) or wrap it in gift wrap, gluing it down well.
- Adhere Boxes to Base. Adhere each gift box to the base using heavy duty glue so they don't fall off when you put the gifts inside. I like mounting squares for this (as shown below... I get them at the dollar store).
 Leave the boxes open until you put gifts inside. You can use re-enforcement labels to strengthen punched holes if you want.
 I've found mounting squares to be a handy and secure method of adhering the boxes to the calendar base.
- Decorate. Once all the gift boxes are in place, you can decorate the rest of the countdown calendar however you like.
I cut out each of the letters for the word DECEMBER and mounted it to squares of sparkly paper.
Step 3. Insert Gifts...
- Insert a Gift into Each Box. Once your Christmas countdown calendar is completed, all that's left is to put gifts inside and tie the boxes closed.
- Tie Boxes Closed. Once the gifts are inserted, pull both ends of the ribbon or craft cord through the single hole in the flap. Then tie the ribbon in a bow, without tying a knot first. If you do this right, each box should open by simply pulling the ends of the ribbon and gently lifting the flap.
What to Put Inside...
You may already know exactly what you want to put inside your Christmas countdown calendar gift boxes. Just in case, following are a few ideas...
Helpful tips to consider. Keep each day inexpensive. Include something meaningful if possible, such as a loving message or a bible verse. Include something extra special in the last box. If you are going to vary the gifts, start small and work your way up to something more exciting.
- A treat for every day.
- Stickers, temporary tattoos, small craft supplies, small party favor type gifts, inexpensive jewelry, flat Christmas erasers, etc.
- Bulk candy either individually wrapped or you can wrap it yourself in homemade parchment or wax paper envelopes.
- A treat and one of the following...
- A loving message for each day.
- A poem, quote or bible verse for each day.
- A reason "I love you" for each day.
- A fun activity idea or a simple recipe (ex. homemade hot cocoa) for each day.
- A reason "I love you" for each day.
- A photo or image you want to share for each day.
Tip... If you are shopping for things to put inside your gift boxes, bring a sample gift box with you to use for verifying whether a gift will fit or not. This is much better than getting home and realizing something you purchased doesn't fit.
To learn more about advent calendars, check out what Wikipedia has to say!
Related Pages...

Search This Site!

Recent Articles
-
Napkin Decoupage Box
Apr 24, 24 04:12 PM
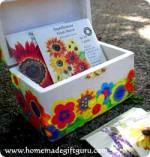 This flowery napkin decoupage box would make a cute thank you gift, birthday gift or Mother's Day gift but can be customized for any person or occasion depending on the napkin design and contents...
 -
Herb Wreath
Apr 10, 24 02:48 PM
 Learn how to make a fragrant herb wreath for a fun handmade gift right from your garden...
 -
Sock Crafts: Sock Bunny Kits
Mar 21, 24 07:34 PM
 Share the fun of sock crafts by making some of these DIY sock bunny kits! Free printable included.