DIY Chocolate Candy Bouquets
How to Make Candy Bouquets Bursting with SWEET Elegance...

Chocolate candy bouquets can be quite elegant!
In fact, pair chocolate bars with an elegant glass vase and you’ve got a candy bouquet worthy of a Wedding, Anniversary or a romantic gift for Valentine’s Day.
Although I sometimes use baskets, tins, small plant pots, or even re-purposed tin cans... a glass vase is my go-to container for edible bouquets that needs a touch of SWEET elegance.
Not only do glass vases add a classy touch to a candy bouquet, your gift recipient gets a new vase for their home.
In my opinion, pretty much anytime is a good time to give a chocolate candy bouquet... because seriously, chocolate bursting from a vase? Hard to go wrong!
By simply choosing the best colors and candy for your gift recipient, your candy gift will be both beautiful and tasty no matter what the occasion!
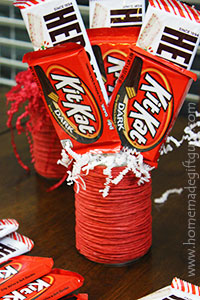
The chocolate candy bouquet featured in this tutorial, was designed to be a homemade wedding gift, but you can design yours for any occasion.
...Here's a link to the printable Wedding gift tags used, in case you want to use them for your own homemade gift project.
Some great occasions to give an elegant chocolate candy bouquet include...
- Wedding Celebrations (see photo above)
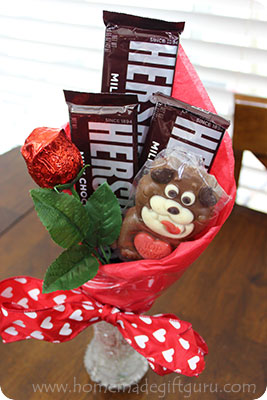
- Valentine's Day (See right)
- Anniversary Celebrations
- Mother's Day
- Sweetest Day
- Birthdays
Learning how to make candy bouquets in glass vases is very easy.
I hope you enjoy reading about this delicious no-bake homemade food gift idea and that you decide to make some of your own. If you do... consider inspiring others by sharing your photos in the gallery!
Chocolate Candy Bouquet Instructions...
Now it's time to show you exactly how to create your own amazing chocolate candy bouquet...
Tips for Choosing a Vase...
The first thing you'll want to do is choose a vase.
The easiest vase to use, is one that will easily fit a piece of floral foam inside.
The straight edge vase I use here is common in dollar stores and crafts stores and it works great for this project.
Use any vase you want but know that you may need to tweak the project just a bit to accommodate different vase sizes and styles.
Gather Your Supplies...
For this simple but elegant chocolate candy bouquet I used...
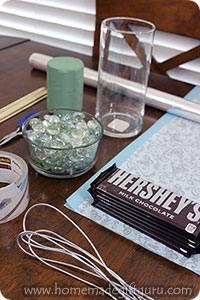
- Glass Vase.
- Chocolate! 6 candy bars.
- Wooden skewers for each candy bar.
- Tissue paper. 3 pieces of square tissue paper.
- Cellophane. Cut one square of clear cellophane to be the same size as tissue.
- Floral Foam. The size shown comes in 2 packs at most dollar stores and craft stores.
- Craft cord or ribbon. I used silver craft cord.
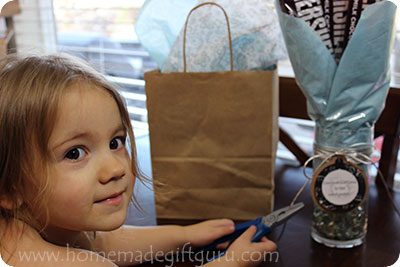
- Gift tag. Make a gift tag or print one out as needed. Here's a link to the wedding gift tag I used and here's a link to several other free printable gift tags and gift tag templates if needed.
- Clear packing tape.
- Glass beads. They have these glass beads at dollar stores or use anything you think will look beautiful. You can also use small individually wrapped candy or loose candy in a clear bag.
- Tool: heavy duty scissors and/or jewelry pliers that can cut the wooden skewers
Candy Bouquet Tip... You don't have to use the tissue paper and cellophane but for a bigger candy bouquet like this one, it helps create a nicely supported, full looking, polished looking candy bouquet in a vase!
Step-by-Step...
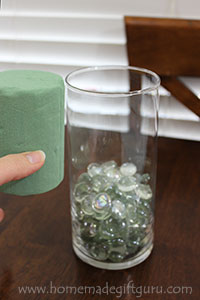
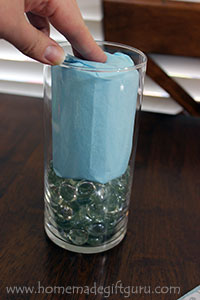
Step 1. Prepare the vase.
If your vase is tall like mine, put some glass beads or other filler inside your vase first, leaving room for the floral foam on top. Cut a strip of tissue paper and wrap it around the floral foam. Check that everything fits perfectly and adjust as needed.
Another tip... if you need your floral foam to be shorter, you can easily cut it with a flat edge knife.
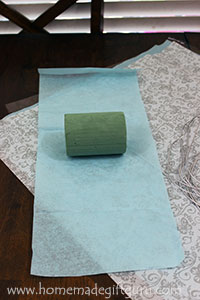
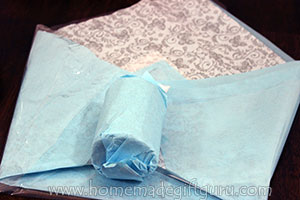
Step 2. Prepare the Tissue Paper.
Lay your square of cellophane down with the points in a diamond position. Lay your remaining two pieces of tissue paper on top of the cellophane. Fold the bottom corner of the cellophane and tissue paper up and the two side corners in. How far up and over you fold the corners depends on the vase you use and height of the candy... adjust as needed.
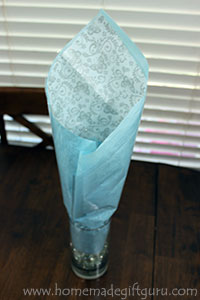
Roll the tissue around the floral foam and insert into vase as shown below... This technique provides a beautiful back drop for your candy bouquet.
Step 3. Prepare the Candy.
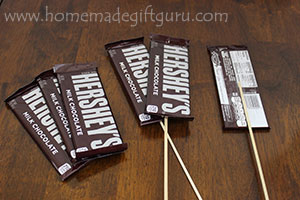
Hold each candy bar up to the vase and determine if part of the wooden skewer needs to be trimmed to get the height you want.
Trim as needed, always trimming from the blunt side. The pointy sides are needed to puncture the floral foam.
Using clear packing tape, adhere a wooden skewer to the back of each candy bar.
Step 4. Insert Candy Bars in Floral Foam.
Place each candy in it's place by pushing the sticks into the floral foam starting with the tallest and working your way forward.
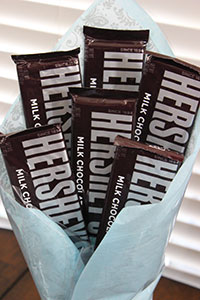
The candy bouquet in the photos is very simple, with just 6 Hershey's bars, but it's also fun to put several different types of candy into one bouquet.
I try to practice basic floral bouquet techniques when making a candy bouquet.
Tip... Kids like to make candy bouquets too! For my young kids, I like to tape the candy to the sticks and then let them design the bouquet. I find it helpful to use a smaller container such as a small pot or an up-cycled tin can.
Step 5. Decorate.
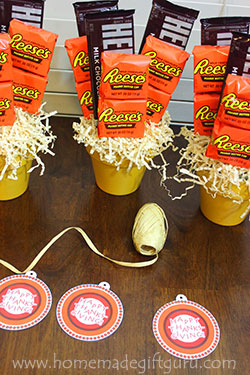
Decorate your candy bouquet however you like using craft cord, ribbon, raffia and/or gift tags. Here, I chose to wrap silver craft cord several times around the vase. I attached a homemade gift tag and then tied the cord in a bow.

And you're done! Wasn't that easy :)
...I'd like to thank my lil' helper below. She gave me lots of great advice as I created this fun little wedding gift and she says (wielding a pair of plastic toy pliers I might add) "I'm helping Mama!"
More Tips for Making a Beautiful and Unique Candy Bouquet in a Vase...

This candy gift project features glass beads inside the vase. The beads help keep the candy bouquet from tipping over. I chose them also because they are elegant.
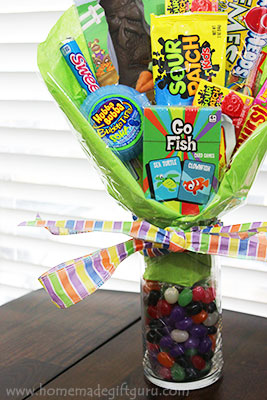
When using a clear vase with a wide enough opening, it's possible to put candy inside the vase rather than glass beads.
You may simply want to sneak in a few individually wrapped chocolate hearts, see photo to the right.
...or you can fill the vase with small candy as shown to the left.
Experiment and have fun! Just be sure to leave room above for your floral foam and you'll be set.

If you choose to include loose candy, it's best to first enclose it in a clear cellophane bag, so that your gift recipient knows it is safe to eat.
To do this, put the bag in first, then pour in the candy, twist and tie the top. Last, just tuck down the top and insert your floral foam on top.
For a more thorough example of this, check out this bright and beautiful Easter candy bouquet. Plus, if you trade out the chocolate Easter bunny for something birthday appropriate, it would be a perfectly cheerful birthday candy bouquet!
Little planter pots also make a really cute container for DIY candy arrangements!
Related Pages...
Search This Site!

Recent Articles
-
Napkin Decoupage Box
Apr 24, 24 04:12 PM
 This flowery napkin decoupage box would make a cute thank you gift, birthday gift or Mother's Day gift but can be customized for any person or occasion depending on the napkin design and contents...
 -
Herb Wreath
Apr 10, 24 02:48 PM
 Learn how to make a fragrant herb wreath for a fun handmade gift right from your garden...
 -
Sock Crafts: Sock Bunny Kits
Mar 21, 24 07:34 PM
 Share the fun of sock crafts by making some of these DIY sock bunny kits! Free printable included.