How to Make Gift Boxes That Really "Show Off" What's Inside
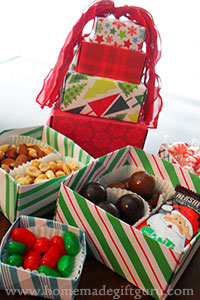
DIY Gift Boxes with Clear Lids Will Show Off Your Beautiful Homemade Treats and Handmade Gifts...

In the past, I've shared with you a couple tutorials on how to make gift boxes.
If you haven't seen them yet, feel free to check out this handmade box tutorial (you'll just need paper, glue and scissors) or this no glue/no scissors DIY origami gift box tutorial.
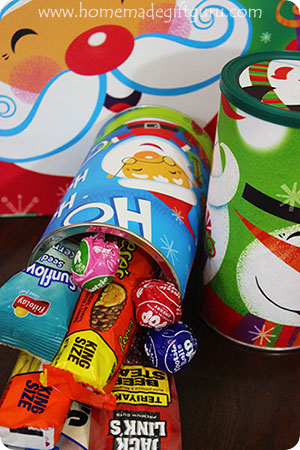
Making your own boxes (and homemade canisters) is definitely a great skill for anyone who makes gifts, whether they are homemade food gifts or handmade treasures!
I have a very special gift box technique I'd like to show you today that I'm simply calling the clear lid technique. This gift box technique has two different, both gorgeous looks.
Clear lids are great for extra special handmade gifts that you really want to show off. Yet, you can also use this technique to make your homemade food gifts look professionally decadent and extremely elegant.
One more way to use these clear lids is with something store-bought. You can use this technique to compliment anything from a few cute little candies to a pair of gorgeous earrings!
Time to Learn How to Make Gift Boxes with Clear Lids...
You can click on either picture below to go straight to the tutorial for that photo or simply scroll down.
Below, you'll find tutorials on how to make gift boxes like each of the photos above... enjoy!
Technique 1: How to make a clear lid that is level with the top of your gift box...

First of all, I'll show you how to make gift boxes with a simple clear lid, so that your gift presentation and the gift itself become one beautiful creation...
These "see-through" gift boxes lend themselves well to all kinds of small baked goods, truffles and even small hand made gifts like homemade ornaments, jewelry and small photo gifts.
You'll Need:
- Acetate. A stiff and clear material for the lid such as acetate, transparency film or clear vellum
- Dry erase marker is helpful
- Ruler or better yet, a ruled grid of some kind
- Scissors, sharp with a good point will work best or a craft knife
- Paper to make origami box... 12 x 12 scrapbook paper is what I use here
- Ribbon for decorating your box
How to Make Gift Boxes - Step-by-Step Technique #1
1. Start with a Box. First, you need a box (just the bottom, no top of course). For this tutorial, I made an origami gift box. Please refer to origami box instructions if needed to make your own origami box.

2. Make the Clear Lid. Next cut your acetate to size. To do this, measure the width and height of your box. Next, add width + height + height to determine the size of acetate you need.

Cut a square from each corner (as shown above) that is the same size as the height of your box. If the height is 2" cut a 2" x 2" square from each corner as shown.
Cutting Tips... I find that placing my acetate on a grid and marking the cuts I plan to make with a dry erase marker works great. Making sure to use sharp pointed scissors will help you make clear square cuts. You can clean any remaining marks using a damp cloth or rubbing alcohol if needed.

3. Fold and Place Lid. Fold each flap down and place over your box. Tie ribbon around your box after you have filled it with something appealing.

Tip: If you don't want to use ribbon to keep the lid secure, you can use a dot of glue under each flap of the clear lid.
All done!
What to put inside?
You can fill a box like this with cookies or other baked goods... candy or nut mixes. You can place clean crinkly shredded paper (the kind made for gift baskets called shred), tinsel or tissue paper inside to pad a beautiful homemade gift such as, handmade jewelry, small photo gifts, photo key-chains, handmade ornaments, etc.
Tip: You can also decorate the clear acetate using stamps or permanent markers.
Next I'll show you how to make gift boxes with clear lids that pop up higher than the box itself... this is really elegant, I just love it when I have an excuse to do this!
Technique 2: How to make an extra tall and fancy clear lid...

The second clear lidded DIY gift box technique is something I learned from Mary Gallagher Stout.
It's very similar to the simple box above except the top of this one actually slips inside the box and extends the height of the box making it twice as tall. The resulting view is lovely.
You'll Need:
- Acetate. A stiff and clear material for the lid such as acetate, transparency film or clear vellum.
- Dry erase marker is helpful.
- Ruler or better yet, a ruled grid of some kind.
- Scissors, sharp with a good point is best.
- Paper, 6 x 6 inches
- Ribbon for decorating your box if desired.
How to Make Gift Boxes - Step-by-Step Technique #2
1. Make Bottom of Box. First, use your 6 x 6 in. paper to make a square box using these origami box instructions...

2. Cut Acetate. Next cut your acetate to 6 x 6 inches. Cut a 2 x 2 in. square out of each corner of the acetate.

Tips.. I find that placing my acetate on a grid and marking the cuts I plan to make with a dry erase marker works great. Making sure to use sharp pointed scissors will help you make clear square cuts. You can clean any remaining dry erase marker using a damp cloth or rubbing alcohol if needed.
3. Fold. Fold each side of the acetate and crease well.

4. Place the Lid. Tuck all four tabs into the box. They will tuck in half way allowing the rest of the lid to stick up and look gorgeous!

Tip... A tooth pick can be used to adjust the inner flaps of the lid if they get caught on each other or don't lay flat against the inside. This can also be a handy way make last minute adjustments to the position of your gift for best presentation.

That's it! The fun part is to... Fill your box! (and put a ribbon on it if desired).
These homemade gift boxes could be filled with candy, treats or a small gift. They make:
- Fun wedding favors.
- Elegant Valentine's Day gifts.
- Adorable Sweetest Day sweets.
- A lovely way to give a piece of homemade jewelry or some other handmade treasure.
- A creative way to give a piece of homemade chocolate or a piece of store-bought designer chocolate.
Now that you know how to make gift boxes with clear lids, I hope you'll continue exploring this site for coordinating homemade gift ideas!
If you find a little JOY in this gift idea, please share a photo in the homemade gift gallery!
==> Show Us What You Made Here!
Related Pages...
Search This Site!

Recent Articles
-
Napkin Decoupage Box
Apr 24, 24 04:12 PM
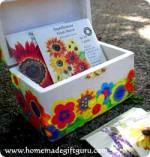 This flowery napkin decoupage box would make a cute thank you gift, birthday gift or Mother's Day gift but can be customized for any person or occasion depending on the napkin design and contents...
 -
Herb Wreath
Apr 10, 24 02:48 PM
 Learn how to make a fragrant herb wreath for a fun handmade gift right from your garden...
 -
Sock Crafts: Sock Bunny Kits
Mar 21, 24 07:34 PM
 Share the fun of sock crafts by making some of these DIY sock bunny kits! Free printable included.