Card Making Idea: Create a Birthday Card
This Birthday Card Making Idea Features a Unique Card Making Template and Fun Variations...
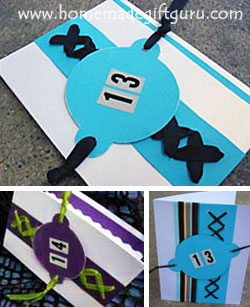
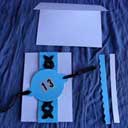
You can use the card making template, provided, to create a birthday card that features the age of the birthday girl or boy.
It's a nice way to say, "Wow, you're 13!" (or whatever age they're turning).
Use your own color scheme when you make your card. All you need is basic supplies... paper, ribbon and numbers.
No need to buy any special card embellishments. Just print out the template below and make sure you have the basic tools and supplies listed in the colors and patterns of your choice.
To Create a Birthday Card Using the Template Provided...
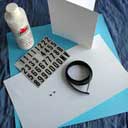
Supplies:
- Card Blank. Size 5" x 6.5" ...here's how to make a card blank
- Template. Print this card making template
- Card stock. Two different colors or patterns (used here is pearlescent white for the background and aqua blue for the embellishments)... at least 5 x 6.5 inches of each paper.
- Ribbon. 1 1/2 yards of 1/8 inch (3 mm) or 1/4 inch (6 mm) wide ribbon.
- Numbers. Black Marker for numbers or number stickers (I used some reflective number stickers leftover from re-doing our mailbox).
- Optional: 2 silver eyelets, 1/8 inch size
Tools:
- Paper
- Scissors
- Decorative Scissors
- Paper Glue/Adhesive
- 1/8 inch hole punch or an awl for punching holes
- eyelet setter if using eyelets (optional)
Instructions:
Cut Out & Punch Paper Pieces. Decorate Circle.
- Cut 1/2 inch off the front right side of your card blank (this leaves 1/2" of inner card showing).
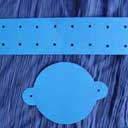
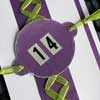
- Use the "ribbon-tag card making template" to create the two embellishments shown to the right. Punch 1/8 inch holes as indicated by black dots on templates.
- Now is the best time to write the age or place number stickers on the round embellishment in the age of the birthday girl/boy. You can also use paint or ink to distress the edges of the embellishments if you choose.
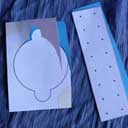
- Cut pearlescent white card stock (or whatever color you chose for front of card) to 5 x 6 1/2" and trim 1/2" off the right side so you have a 4 1/2 x 6 1/2 and a 1/2 x 6 1/2" piece.
- Align circle embellishment on 4 1/2 x 6 1/2" cardstock in final position. Using circle as guide, punch the two holes all the way through cardstock.
- Use decorative scissors to create a 1/2 x 6 1/2" strip in the same color paper as embellishments, left side trimmed with decorative scissors.
Weave Ribbon and Attach Embellishments.
- Take 1 yard (36 inches) of ribbon and sew or weave the ribbon through the holes in the rectangular embellishment. The pattern to the right shows how to sew a criss-cross pattern with the red numbers indicating to pull the ribbon up through the paper and the black numbers indicating to pull the ribbon down.
- If you choose to use the eyelets, set them now in the punched holes of the circle embellishment.
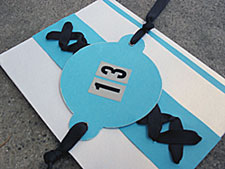
- Line up the holes in the 4 1/2 x 6 1/2" piece of card stock and those in the circle embellishment. Pull 8 inches of ribbon through the holes on each side of the card stock and circle embellishment. Tie ends of ribbon on each side using overhand knot as seen above.
- Cover back of sewn embellishment with glue and carefully slip it behind circle embellishment (as shown to the right), pressing evenly once it's in place.
Attach Everything to Your Card Blank.
- Open the card blank and glue the 1/2" straight strip inside on far right.
- Then glue the decorative edge strip 1/4" in from the left
with the decorative edge facing in (it will overlap previously glued
strip). These pieces will show when the card is closed.
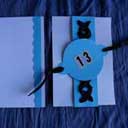
- Now glue the fully embellished card stock to the front of the card blank, careful to line up all edges. Allow your card to dry (I like to place a heavy book on top of my card to encourage it to stay flat).
That's it!
Of course, you will probably adjust this idea to your liking.
Use your own colors, patterns and embellishment ideas to create a
birthday card that's perfect for the birthday boy or girl.
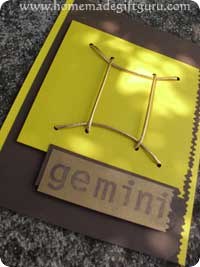
Variation... You could also use this idea with a birthday astrology sun signs. Rather than including the birthday age, you can create a birthday card by tracing one of these birthday astrology symbols using the appropriate template.
Related Pages...


Search This Site!

Recent Articles
-
Napkin Decoupage Box
Apr 24, 24 04:12 PM
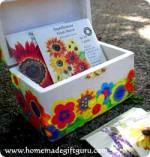 This flowery napkin decoupage box would make a cute thank you gift, birthday gift or Mother's Day gift but can be customized for any person or occasion depending on the napkin design and contents...
 -
Herb Wreath
Apr 10, 24 02:48 PM
 Learn how to make a fragrant herb wreath for a fun handmade gift right from your garden...
 -
Sock Crafts: Sock Bunny Kits
Mar 21, 24 07:34 PM
 Share the fun of sock crafts by making some of these DIY sock bunny kits! Free printable included.