DIY Homemade Canister Gifts
Learn the Very Best Way to Up-Cycle a Canister for Use With a Variety of Homemade Gift Ideas...

Sometimes a homemade canister is exactly what you need for your holiday food gifts!
I find them incredibly fun and useful. The best canisters to start with are food canisters, with tin linings, like the ones used to package things like coffee, hot cocoa and creamer.
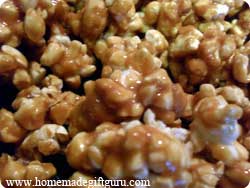
The inner lining is there to keep your food fresh, and that's exactly what it will do when you re-use it for homemade goodies, such as caramel popcorn.
In addition to being used to keep homemade food gifts fresh and beautifully presented, these DIY canisters can be filled with themed gifts, such as a movie night canister, a birthday canister or a game day canister.
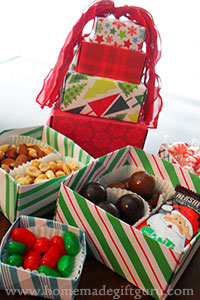
You can also turn your homemade canister into a super quick homemade gift for any holiday, by designing it for the holiday and then filling it with sweet candy bars and/or salty snacks, like sunflower seeds and beef jerky.
I used the Christmas canister shown to make a fun homemade Christmas gift that I sent in the mail. It shipped great too, which is something I'm always looking for!

What makes my up-cycled canister tutorial the best?
I have a special method to creating my own homemade canisters, which I discovered by trial and error... and lots of experience.
I've made canisters using a variety of decorative papers... for example, I tried gift wrap but it turned
out wrinkly. I tried scrapbook paper but it's never big enough to
wrap around my canisters, a fact that always bugs me. I've even tried a few decoupage techniques... but ultimately, I wanted something super quick and easy that turns out perfect every time.
My Favorite Up-Cycle Method for Canisters...

My favorite method is super quick... it is very easy and it turns out perfect every time!
That's right... I finally discovered the very best way to up-cycle a canister and it's particularly exciting because we pretty much all have these materials hanging around our houses collecting dust.
It's gift bags!
It's a simple idea but well worth the trial and error I experienced. Gift bags come in a HUGE variety of styles and often, once they get used the first time, they never get used again.
You can find character gift bags, themed gift bags, huge gift bags, shiny gift bags, gift bag covered in sparkles or bling. Gift bags for any and every holiday, occasion or event. Even bags for sports and other activities!
Here's an Easy Homemade Canister Tutorial:

The following up-cycled canister method is super easy and it turns out flawless every time! Gift bags are perfect because...
- Perfect Size. Gift bags just happen to be the perfect material to up-cycle a canister. For one thing, unlike scrapbook paper, which never seems to fit around the canisters, gift bags are plenty big enough.
- No Wrinkles. They also adhere without wrinkles and they have an amazing smooth and sturdy look and feel to them.
- Durable. They last a long time. We've been reusing some of our canisters every Christmas, and they still look great!
- Tons to Choose From. There's a ton of images to choose from. Anything from sports to characters to holidays.
- Inexpensive. And lastly, they are an inexpensive resource (you can find them at dollar stores) or maybe you already have some around, making them a potentially free material in need of your up-cycling expertise.
Tools and Supplies List:
- A clean canister. Preferably with an air-tight silver lining.
- A gift bag. Make sure it is big enough to cover your canister, most are.
- Glue. A glue stick works well but other glues that work with paper should be ok.
- Scissors
- Paper Cutter. I love using a paper cutter because it is so precise but it is optional, scissors will do.
Step-by-Step Homemade Canister Tutorial:
Step 1: Measure Canister. Measure the height and diameter of the canister you want to re-purpose. Use a flexible ruler to measure around the canister or simply wrap a piece of string around the canister and then measure the string with a standard ruler.

Step 2: Cut Gift Bag Open. Find a beautiful gift bag and cut it down one side. Cut off the bottom so you have a flat piece of paper.

Step 3: Trim Gift Bag Paper to Size. Using a paper cutter or scissors, trim the gift bag to the height of the canister. If you need to trim some off the width as well, just remember to leave an inch or so extra... this way you can overlap the paper when you wrap it around the canister.

Tip: Pay attention to what part of the image on the gift bag will be on the front of your homemade canister.
Step 4: Apply Glue. Apply glue to the canister and also the back of the paper. Make sure to apply plenty of glue to the top and bottom area of the canister so it stays secure.

Step 5: Adhere Paper to Can.
Starting with one side of the paper, press it down firmly across the length of the canister. Make sure the top and bottom of the paper is even against the can and smooth it out as you roll the canister around and press the paper evenly.
Wipe any glue that is squished out the sides with a washcloth, paper towel or piece of fabric. I also use the washcloth to smooth out the paper, it works great!


Step 6: Lid. If needed, cut a circle for the lid and glue it down.


That's it for this tutorial... you can fill your homemade canister with caramel popcorn or other treats.
You can also make a themed canister gift (kind of like a gift basket) by filling it with a few themed items for a special occasion.
For example...to create a Halloween themed canister gift you could include glow bracelets, flashlight, panic whistle and Halloween treats. Check out these Halloween gift baskets for more Halloween theme ideas.
I hope you found this tutorial useful! Below, I've included three more tutorials you might like...
Related Pages...
Search This Site!

Recent Articles
-
Napkin Decoupage Box
Apr 24, 24 04:12 PM
 This flowery napkin decoupage box would make a cute thank you gift, birthday gift or Mother's Day gift but can be customized for any person or occasion depending on the napkin design and contents...
 -
Herb Wreath
Apr 10, 24 02:48 PM
 Learn how to make a fragrant herb wreath for a fun handmade gift right from your garden...
 -
Sock Crafts: Sock Bunny Kits
Mar 21, 24 07:34 PM
 Share the fun of sock crafts by making some of these DIY sock bunny kits! Free printable included.