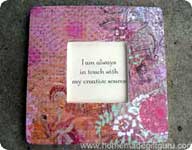
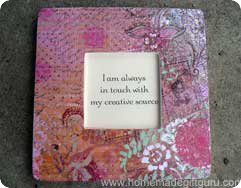
Mother's Day Decoupage Frame with Inspirational Quotes
...How to create a meaningful Mother's Day decoupage gift perfect for your MOM!

This uplifting Mother's Day decoupage project is especially meaningful, because you get to choose a type of inspiration that will be perfect for YOUR mom.
Here's a few ideas of what she might enjoy seeing everyday...
- Bible Versus
- Affirmations... wondering what an affirmation is?
- Quotes... a simple google image search for "inspiring quotes" or "uplifting quotes" will give you lots of good ones to choose from!
...If your mom has a favorite author or spiritual mentor, you can find quotes by that person.
My mom and I love affirmations by Louise Hay, so I used several affirmations from my favorite deck of affirmation cards called... Creativity by Louise Hay.
You can also make one of these uplifting frames for your best friend, a new mom, your husband or wife or anyone else you feel this idea is perfect for.
...I also love this idea for a homemade graduation gift!
You can make your Mother's Day decoupage frame using any patterned paper, so feel free to choose something that will suit her and her decor.
Of course, you may choose to cut out your designs instead of using a whole piece of paper like I did here. That's part of the fun of decoupage. I just happened to fall in love with this gorgeous piece of paper and thought it would look best whole.
Mother's Day Decoupage Frame: Getting Started...
The main components to this project are a wooden frame, a gorgeous piece of decorative paper and something perfect and inspirational to frame for your Mother (or for whoever this project will be for).
In addition to the main materials, here's a list of what you'll need to complete this decoupage project...
Materials and Tools:
- patterned paper or paper images to decoupage
- wooden frame from craft store
- fine grain sand paper
- acrylic paint (white) and paint brush
- decoupage glue or white glue and foam brush
- water based varnish and soft side brush
- spray bottle with water
- pencil
- ruler
- scissors
- clean lint free cloth
- optional: printer and linen paper
Instructions...
- Clean Frame. Start by lightly sanding frame and cleaning with a soft lint free cloth.
- Create Paper Template. If using a large piece of paper, it can be helpful to make a template to show you what part of the paper will look best (see below).
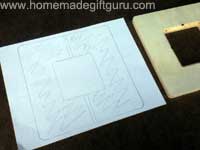
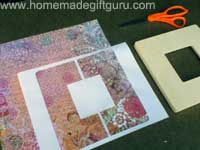
- Trace Frame. Once you decide what part of the paper to use, draw an outline of the frame and opening on the back of the paper.
- Cut Paper. Cut out paper very carefully.
- Paint Frame. Paint frame with acrylic paint. It may take a couple coats. This will seal the wood and get it ready for decoupage. Allow to dry between coats and sand as needed.
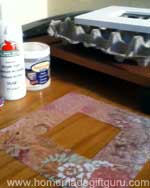
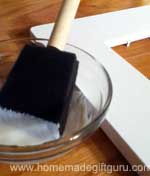
- Glue Paper. Once the paint is dry, you can glue down your paper using decoupage glue, such as Modge Podge or even Elmer's Glue (slightly watered down), applied with a wide foam brush for example. Allow to dry thoroughly. See below for tips!
Decoupage Tips...
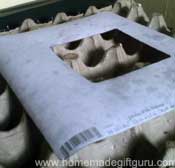
Before applying glue, it is really helpful to ever so slightly, dampen the paper with a spray bottle. This will allow the paper to tighten and then relax, which will prevent wrinkles that often occur as the paper dries from the glue.
 |
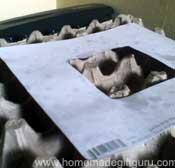 |
Above: In the first image, the paper curls up (tightens). In the second image the paper flattens (relaxes) and is ready to be glued down.
Also, when applying glue it can be helpful to start by gluing a corner of the paper only.
Once the corner is glued exactly where it should be, you can work your way across, applying glue section by section, smoothing and cleaning extra glue with a clean cloth or paper towel.
Work gently as the paper will be delicate.
Get more helpful decoupage instructions and tips here!
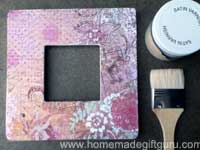
- Seal. In my opinion, varnish works better than Modge Podge, it is thinner and levels out better... Now it's time to apply the varnish! You'll only need one to two coats applied with a wide soft brush (such as goat's hair). Allow to dry before applying a second coat.
Note: If you cut out a special design, use as many coats of varnish as it takes to make the cut out look and feel like it's part of the frame (always allowing to dry between coats).
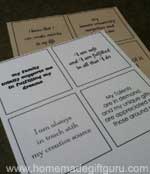
- Create Inspiration Cards. Now that the frame is done, it is time for the inspirational inserts. First, choose a few quotes, affirmations, bible verses or inspirational words (I chose affirmations from my Creativity Deck (by Louise Hay) that your mom would like.
Then, using a nice paper such as linen, create several cards that can be changed anytime she wants a new bit of inspiration.
Ideas for Creating Inspiration Cards...
...Type them up on the computer and print them out.
...Use stamps to create them.
...Write them out using high quality markers or a calligraphy pen.
...Or use sticker letters and/or scrapbook embellishments to create daily cards.
Related Pages...
Search This Site!

Recent Articles
-
Napkin Decoupage Box
Apr 24, 24 04:12 PM
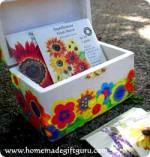 This flowery napkin decoupage box would make a cute thank you gift, birthday gift or Mother's Day gift but can be customized for any person or occasion depending on the napkin design and contents...
 -
Herb Wreath
Apr 10, 24 02:48 PM
 Learn how to make a fragrant herb wreath for a fun handmade gift right from your garden...
 -
Sock Crafts: Sock Bunny Kits
Mar 21, 24 07:34 PM
 Share the fun of sock crafts by making some of these DIY sock bunny kits! Free printable included.