Inexpensive & Easy to Make Journal Gifts
Don't Throw Them Away... Recycle Old Greeting Cards into Meaningful Homemade Journal Gifts

This easy to make journal idea is similar to the first homemade journal I shared, but it features a different design element that is both fun and super thrifty.
It starts with a used greeting card. That's right, don't just throw away beautiful greeting cards!
The images from greeting
cards and post cards can actually make cheap homemade gift ideas with style and meaning.
So many awesome "cheap homemade gift ideas" start with something already lying around the house.
There's so much that we can utilize if we open our minds to this possibility... such the huge array of glass jars and bottles that makes it's way in and out of nearly every kitchen.
Another of my favorite tips for creating cheap homemade gift ideas (that don't make cheap gifts) is up-cycling images like I did with this easy to make journal.
Sometimes I save my cards for sentimental reasons, but when that's not necessary, I put them in a special craft box, knowing some day I can give them a new life by turning them into something creative and beautiful.
Here's a Few Ideas for Up-Cycling Images...
- Homemade Greeting Cards. You can up-cycle your beautiful images from post cards and greeting cards into new brand new made-with-love greeting cards by simply cutting out the picture, mounting it on some card stock and gluing it to the front of a new card base.

- Homemade Gift Tags. You can turn various images into homemade gift tags. There's lot of ways to do this. One way to make gift tags from old cards, is to use one of these free gift tag templates like a stencil, cutting a beautiful gift tag from a beautiful image. You can also cut a gift tag free-hand or by using a paper punch like I did in the photo to the right. Even the inside sentiment, such as "Merry Christmas" or "Thank you!" can sometimes be used creatively.
- Framed Art. You can frame images using store-bought or homemade photo frames. In fact, one my favorite creative photo frames is this simple decoupage frame and it would work great paired with the right re-cycled image(s). If it's a greeting card, simple cut the image to size and frame it. You can also mat the image on a slightly larger piece of card stock for a nice touch.
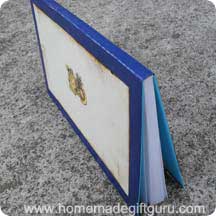
- Homemade Journals. I love a good homemade journal, idea book or quote book. Here's a few ideas for journal themes. And following is how I turned a greeting card I adored into a beautiful homemade journal to give my friend for her to write her favorite quotes inside...
Choosing the Perfect Image. The key to making this a great homemade gift, is to match up the prefect image with a journal theme that your gift recipient would be interested in (ex. garden journal, poetry, new business inspiration etc).
The image can be come from anywhere (even an old calendar), but re-using an old greeting card or post card works great and provides a lot of easy to make journal options.
If you don't have any images readily available, try making an image yourself by painting, drawing, coloring, stamping or nature printing.
You can also find free stock photos on the web such as www.stockvault.net. For a cute look, you might try some free clip art such as the freebies on www.hasslefreeclipart.com.
For this Journal...

The image I used to make this journal, is a favorite greeting card by Josephine Wall.
You can view her site at www.josephinewall.co.uk. This will take you to her Art Gallery where you can see more images like the one I used above.
Note: It's ok to use purchased art images for fun in your personal project but if you decide to show off your gift in a forum or on a blog for example, be sure to give credit to the artist or copyright holder of any images used. It is your responsibility to understand copyright laws pertaining to any images you use.
You can take any notebook and work your own paper art magic in any way you're inspired... but here is a list of materials I used to create this easy to make journal project.
I prefer to use a composition notebook as my base, because they are sturdy and inexpensive.
Supplies:
- 1 composition notebook (100 sheet, 200 page, 9 3/4 x 7 1/2 in./24.7 x 19.0 cm)
- 12 x 12 scrapbook papers, 6 pieces in 3 colors...
cut to the following sizes (change colors as desired or use patterns, the colors I refer to are the colors I used for the journal in the photos)
7 1/4 x 9 1/4 inches, lavender paper
6 3/4 x 8 3/4 inches, black paper
11 3/4 x 12 inch, black paper
11 3/4 x 8 1/2 inch, cream paper
9 1/2 x 7 1/4 inch, cream paper (end sheet 1... inside of front cover)
9 1/2 x 7 1/4 inch, cream paper (end sheet 2... inside of back cover) - Image (examples... postcard, greeting card, photo, clip art, magazine picture, picture from old calendar, even a piece of gift wrap could work)
Tools:
- Flat 12-inch ruler
- Craft knife or razor knife
- Glue such as glue runner or glue stick
- Bone folder or metal spoon
- Scissors and/or paper cutter
Step-by-Step Easy to Make Journal Instructions...
Step 1. Cover the back of the note book in quality paper.
I used 65 lb card stock for this book cover. You can use any thickness you desire however, paper that is extremely thick will be hard to fold and paper that is too thin is often see-through.
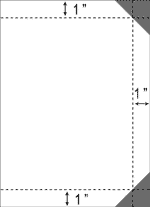
To do this... start with the 11 3/4 x 8 1/2 inch "cream colored
paper." Fold paper 1 inch from top, bottom and right side (as shown by
dotted lines in diagram to right). Smooth folds with bone folder tool or
the round part of a spoon.
Tip: To ensure a snug fit, I like to make the top and side folds first, then place the paper on the notebook and make the last fold with the notebook in place. This way the book cover will be sure to fit exactly. Remove to smooth the fold with bone tool.
Cut off the top and bottom right corners as shown in gray.
After checking to see that the cover fits well, glue the paper to
the back of the notebook, wrapping and gluing the flaps as well to the
inside of the back cover.
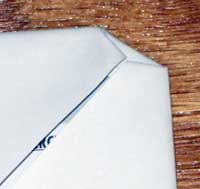
Tip: If your notebook has a rounded edge as mine does, simply
pinch in the corner of the cover before you fold the edges over as
shown below. Then resume the fold exactly as you would have done
otherwise.
 |
 |
Step 2. Cover front of book and stretch across spine.
This is done almost exactly as you just did with the bottom cover. The only difference will be an extra length of paper that folds over the spine and onto the back of the book.
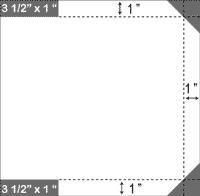
To do this... take your black paper that is cut to 11 3/4 x 12 inches. First cut off a 1 x 3 1/2 inch rectangle from the top left and bottom left of your paper (as shown in the image to the right).
Now follow the directions from step 1 to make the book cover flaps. Glue the paper to the front cover with the flaps folding to the inside. Then stretch and glue the extra paper to the spine and back cover. Glue thoroughly and allow to dry before moving on. Your book is now covered and ready for your designs.
Step 3. Make a mat and frame for your picture.
I used a 5 x 7 in. image for this project. I made the inside of the frame 4 x 6 inches. For different sized images adjust measurements as needed.
Start with the black paper that is 6 3/4 x 8 3/4 inches. Lightly
mark your 4 x 6 in. rectangle on back side of the paper (using pencil).
With a craft knife (and on a suitable surface) cut a cross from corner
to corner. Now either cut out the rectangle with scissors or tear the
paper as I did for this example.
To tear a relatively straight line, hold the ruler down along the
approximate line you want to tear and pull toward you, allowing the
ruler to guide the tear. Do this gently.

Once the frame is done, glue the picture underneath.
Now center and glue them both to the lavender paper that is 7 1/4 x 9 1/2 inches. You should have a 1/4 in. lavender border with a large black frame.
Now glue the finished frame thoroughly to the center of the front of the book.
Step 4. Apply the end sheets.
The front and back of your easy to make journal are now complete. The finishing touch is the end sheets. These are the two 9 1/2 x 7 1/4 in. pieces of cream colored paper. Fit them against the inside of each cover, pushed in as far as possible toward the spine and centered between top and bottom. Glue each one down thoroughly, smooth and allow to dry. The end sheets give this easy to make journal a sturdy and polished look from cover to cover.
Note: If the corners are rounded, snip the point off the end sheet as needed.
That's it!
Btw, recycled craft gifts like this easy to make journal make great homemade teen gifts!
More Recycled Craft Ideas...
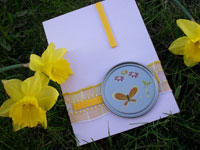
If you enjoy recycled craft ideas, you may also love this recycled craft greeting card that utilizes a tin apple juice lid!
More Easy to Make Journal Ideas...
- More on homemade journal ideas and themes
- Another easy to make journal
Related Pages...

Search This Site!

Recent Articles
-
Napkin Decoupage Box
Apr 24, 24 04:12 PM
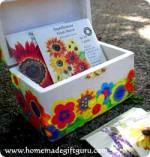 This flowery napkin decoupage box would make a cute thank you gift, birthday gift or Mother's Day gift but can be customized for any person or occasion depending on the napkin design and contents...
 -
Herb Wreath
Apr 10, 24 02:48 PM
 Learn how to make a fragrant herb wreath for a fun handmade gift right from your garden...
 -
Sock Crafts: Sock Bunny Kits
Mar 21, 24 07:34 PM
 Share the fun of sock crafts by making some of these DIY sock bunny kits! Free printable included.