Recycled Craft Card Ideas
Use Free Recycled Materials to Make Creative Handmade Greeting Cards...

A few good recycled craft card ideas will help you make thrifty greeting cards and gift tags to go with all your fun homemade gifts!
Plus, recycling... a.k.a. up-cycling is a fun way to come up with unique card making embellishments.
And it's good for the environment to reuse resources (even better than recycling, since recycling requires energy and resources still).
Utilizing and reusing materials you would normally throw away can really spark your imagination!
And fortunately, I've noticed the use of recyclables to make recycled crafts is getting more and more popular, which really just puts a smile on my face.
Recycled Craft Card Ideas...
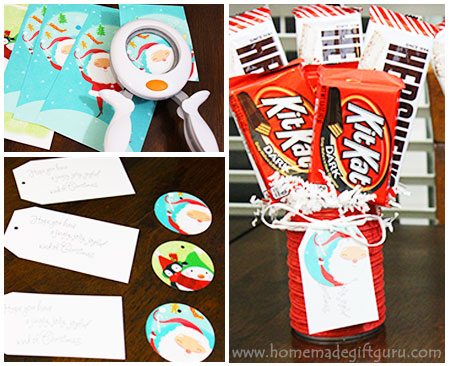
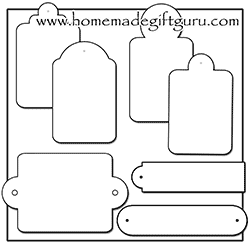
- Re-Use Images. From old cards and post cards to used and outdated calendars, these images can be cut to make recycled craft cards. They can also be used to create framed art gifts, gift tags, easy homemade notebook journals and more.
- Old Key. Give an old key a new life by spray painting it and gluing it to the front of a sturdy handmade greeting card. You can write something like... "You hold the key to my heart" for a sweet and romantic hand made greeting card idea.
- Puzzle Pieces. Once a puzzle is missing a few of it's pieces, it's probably time to retire it. I love making recycled craft cards using puzzle pieces. Simply glue two matching pieces to the front of a card and write something like... "You complete me" or "We belong together."
- Buttons. No need to throw away spare buttons. Buttons are fun and easy to use in card making! For example, you can draw flowers on the front of your card using buttons to form the center. You can make a border for your card using small buttons. Buttons also make cute butterfly bodies... in fact, this butterfly card is a good example of buttons on a homemade greeting card... and be sure to notice the gift wrap used to form the butterfly wings too.
- Gift Wrap. You can save beautiful gift wrap and turn it into greeting cards. You don't need to use all of it. Just cut out squares from gift wrap or cut specific images and glue them to the front of the card. If you first glue your gift wrap pieces to pieces of card stock, no one will even know it was once gift wrap. Gift wrap works great in place of patterned paper. Also, in addition to making recycled craft cards, you can use gift wrap to make thrifty decoupage gifts.
- Pieces to Ruined Board Games. My favorite idea here is to use scrabble tiles from ruined scrabble games to make words like "LOVE" "US" "MOM" "DAD" "BABY" or whatever the theme of your card will be. The key here is to make a sturdy card blank so that the tiles can be glued to a sturdy base. In other words, use heavy card stock to make these cards.
- Soda Cans. You can cut soda cans into cute tin embellishments like hearts, flowers and even butterfly wings and then glue them to the front of your handmade cards. It's a simple process that starts with cutting the top and bottom from the can using a sharp craft knife. Then cut along the seam of the can. At this point, you can open the tin to form a tin rectangle that can be cut to make cute embellishments for your homemade cards. You can take this idea even further by painting or spray painting your tin embellishments. You can also make fun designs in the tin by punching small holes into different patterns using a small nail.
- Frozen Juice Lids. Frozen juice lids can be used like frames in card making. Whether you use a frozen juice lid to frame a photo, some stickers or a dried pressed flower, frozen juice lids can be a fun addition to your craft projects.
In fact, below I've shared a very quick and easy idea for using a frozen juice lid in your next card making project.
A Recycled Craft Card Idea Using an Up-Cycled Juice Lid...
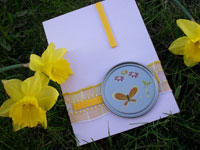
This recycled craft card was made with a few basic craft supplies (paper, foam, ribbon) and a juice lid (the kind from a can of frozen apple juice).
The lid makes a cute metal frame for whatever stickers or picture you might want to put inside. Plus, it's light weight and flat enough to be mailed...
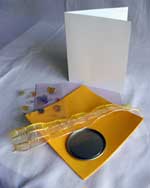
Tip... Bubble mailers do work best for mailing 3D handmade greeting cards like this one. I get 3 for a dollar at our dollar store... but here's how you can make your own super cute bubble mailers using re-claimed materials (or of course, you can use the paper of your choice, it's fun to make your bubble padded mailers match your handmade greeting cards).
Here's how I made this recycled craft card.
Materials...
- 5 x 7 Card Blank. Buy card blanks at craft stores or here's how to make a card blank from card stock.
- Card Stock. Shown here is Worldwin Treasures lavender with linen texture.
- 7 inches of Ribbon. I used 1 1/2 inch wide sheer ribbon.
- Foam Sheet. In coordinating color (peel and stick is great).
- Stickers. Finally, an excuse to use some of those cute vellum stickers in your craft stash! You can use any stickers you like, or glue down pictures or even a dried pressed flower. Pressed flowers should be sprayed with a sealer after being adhered to the lid.
- Frozen Juice Lid. The tin kind that comes on frozen juice.
Tools...
- Scissors
- Glue
Instructions...
- Step 1: Cut Paper. Cut card stock to the same size as card blank, in this case 5 x 7 inches.
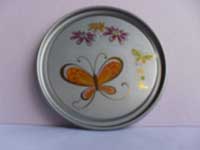
- Step 2: Embellish Lid. Arrange chosen stickers on clean juice lid, using lid as a frame. Translucent stickers such as vellum look especially good on tin.
- Step 3: Add Ribbon. Place ribbon on card stock and tape or glue to the back. Once ribbon is secured, glue the entire piece of card stock to the front of card blank.
- Step 4: Glue Foam and Lid. Place a thin rectangular strip of foam over
ribbon, centered. Place juice lid frame on foam to the right side and
glue to foam.
Note: I found it helpful to glue down a couple pieces of foam (small enough that they won't be seen) under the juice lid embellishment for support at top and bottom.
- Step 4: Glue Foam and Lid. Place a thin rectangular strip of foam over ribbon, centered. Place juice lid frame on foam to the right side and glue to foam.
- Step 5: Add Foam to Draw Eye. Place another thin strip vertically from top. Make it point to the center of the juice lid embellishment to draw the eye to your creative centerpiece.
I hope you found this card making idea to be fun and easy.
...and if you make your own recycled craft cards or homemade gifts using recycled materials, be sure to help us inspire others by sharing your photo and idea in the HMGG gallery! Thank you :)
Related Pages...
Search This Site!

Recent Articles
-
Napkin Decoupage Box
Apr 24, 24 04:12 PM
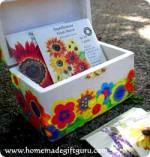 This flowery napkin decoupage box would make a cute thank you gift, birthday gift or Mother's Day gift but can be customized for any person or occasion depending on the napkin design and contents...
 -
Herb Wreath
Apr 10, 24 02:48 PM
 Learn how to make a fragrant herb wreath for a fun handmade gift right from your garden...
 -
Sock Crafts: Sock Bunny Kits
Mar 21, 24 07:34 PM
 Share the fun of sock crafts by making some of these DIY sock bunny kits! Free printable included.